Saturday 30 August 2014

Brioche buns


I have been meaning to try baking my own hamburger buns, as the store bought ones are simply disgusting. The quality of bread in general in this country is indescribably substandard. The only way of getting a decent loaf of bread is to bake it yourself. Sometimes you may run across a small bakery that makes good bread, but living beyond all civilisation we don't have any good bakeries anywhere near us. I do like my burgers in a nice brioche bun, so I thought why not try it. As I was working the dough I was once again reminded that making brioche dough by hand is a pain, and that I need to start saving up for that Kitchen Aid ASAP.

I found this recipe by simply googling brioche buns. It's from a blog called The Clever Carrot, and they looked so yummy. The blog also has some great step by step tutorial with photos if you are not a very experienced baker (but it's only for using a food processor to make the dough).

Brioche hamburger buns (makes 8):
1 cup warm water
3 tbsp warm milk
2 tsp dry yeast
2 1/2 tbsp sugar
2 large eggs
3 cups bread flour
1/3 cup all purpose flour
1 1/2 tsp salt (I would decrease this to 3/4 - 1 tsp)
35 g butter
(seeds for topping if desired)


The howto:
Mix the water, milk, yeast and sugar in a jug or small bowl and let stand for five minutes. Meanwhile lightly whisk the egg in another small bowl. In a large bowl, mix the flours, salt and butter and either use a paddle attachment on a stand mixer or your fingers to process until resembling coarse sand. Add the yeast mixture and egg and either process in a stand mixer for 8-10 minutes until a dough forms, or use your hands to mix and then knead for 10-15 minutes. The dough is sticky and rather tough to knead by hand, but don't add more flour as that makes the dough too dense. I used a dough scraper in one hand and the other hand to do the kneading. It will get slightly less sticky at some point when the gluten starts forming. Return to the bowl and let the dough rise until double in size. This will take 1-3 hours, and it's worth letting it rise properly as that is what will give you those wonderfully light and fluffy buns. 

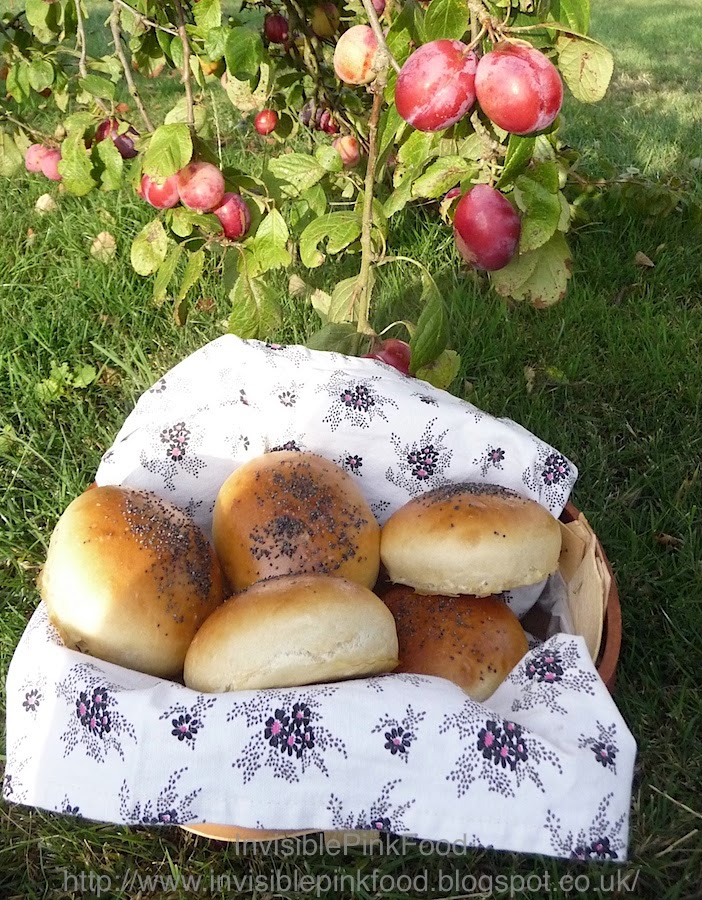
When you are happy with the size of you dough, scrape it out onto a floured surface, and knead a few times to push out all the air. Divide into eight equal sized balls, and shape into rolls. Place onto a parchment paper covered baking sheet and cover with a towel and leave to rise for another hour. Towards the end of the second raise, pre-heat oven to 200 degrees C (400 degrees F). Brush with egg wash ( egg mixed with a bit of water) and sprinkle with seeds of choice if desired. Place an oven proof dish with water in the lower part of the oven, and place rolls in the oven to bake for 15-20 minutes, until golden brown. Let cool.


The verdict:
Before starting, I have to admit I made a mistake when making the dough, which I only discovered when I typed up the recipe for my blog post. I only put one egg in the dough instead of two. I was wondering why the dough wasn't quite as soggy as I had expected (although it was sticky enough, trust me). So all I can say is that the buns turned out great when using one egg. They were really tasty, and very light and fluffy. The only change I would make is to reduce the amount of salt to half of what it is, I don't like my bread very salty and this was certainly a bit on the extreme side. But other than that, these were the perfect hamburger buns. They were also perfect for eating with nothing but butter while fresh out of the oven, and they were perfect for eating for breakfast with butter and jam (such as this awesome plum jam). This is definitely a keeper, although the kneading is a bit of a messy business it's definitely worth the effort. 
The buns are perfect for hamburgers but also delicious
simply with some butter and jam.

Tuesday 26 August 2014

Plum jam


I refuse to think it's fall yet, it's just late summer, right? It must be summer because we are still getting plenty of tomatoes and courgettes. But on the other side, I have to admit that the onions have been harvested as have the potatoes. And it's pouring with rain outside, and we don't sleep with the windows open anymore so maybe it's time to stop kidding myself and admit it it slowly turning into fall. I can't believe August is coming to an end. But the good thing with fall is that the produce keeps rolling in, it's time for figs and plums, and when they are done there are still the pears and apples to look forward to. This is our second harvest season in our home, and although I don't wish for big things in my life anymore, the one thing I do wish for is that there will be many more harvest seasons in this house. 

I don't think I've ever made my own jam before. In my mind it has always been a somewhat daunting task. However, we didn't use all of the plums I froze last year so I thought this year we should make something different from whatever our two (well, more like one and a half) plum tree produces. The Culinary Consultant's Dad gave us a jar of yummy plum jam last year, so I thought let's just give it a try and see what happens.

I googled plum jam and found this useful recipe for all sorts of jams on BBC good food. So that's what I followed, except I didn't put any butter on top of the jam because I found the idea a bit revolting. I wasn't sure whether you were supposed to peel the plums before making the jam, what we did was to put them in there with the skins on and then sieve the jam through a colander to remove the skins when it was done. I love that the jam got a beautiful pink colour, which I don't think it would have without the peel. It also gave the jam a slightly bitter flavour, which both of us liked (think along the lines of orange marmalade). I had enough plums to make one and a half times the original recipe, so we have a nice little collection of very randomly shaped jam jars in the fridge (I added the amounts I used in parenthesis in the recipe below). The original recipe says it makes about 1.2 litres, so my extended version should make about 1.8 litres. As our jars were all different sizes and shapes, it's a bit hard to confirm but I guess that's about right.


Plum jam (makes about 1.2 (1.8) litres):
900 g (1400 g) plums
150 ml (225 ml) water
900 g (1400 g) sugar

The howto:
Prepare your jam jars and lids. Wash them in hot, soapy water and rinse. Shake to remove excess water but don't towel dry. Place on a newspaper covered oven tray, making sure the jars don't touch each other. Put into a cold oven and leave to wait. Quarter your plums and remove the stones. Add water and bring to a gentle boil, cooking until fruit has softened, about 30-40 minutes.

Towards the end of the cooking time, turn the oven with the jars inside it to 120 degrees C. Make sure jars are at 120 degrees C at least 10 minutes, and until all water has evaporated from them.

When the fruit is soft, add sugar, and keep on low heat until dissolved. Bring to a rolling boil and cook until the jam has reached setting point (105 degrees). This should take about 10 minutes, although I left it cooking for a bit longer as it didn't feel like it had started to thicken at all at 10 minutes.

You can now transfer the jam into the sterile jars. I however sieved the jam through a colander to remove the peels, brought it back to a quick boil and then transferred to jars. Label and seal. I made little labels using my printer and some crafting stuff. The font is called Jane Austen and it's freely downloadable, it's just perfect for so many things including jam labels.

The verdict:
When we poured the jam into jars, it was still rather runny, and I wasn't sure it would set properly. But it did! Once it cooled off, it became the perfect jammy sticky consistency. It's so good that in one day we had already consumed half a jar. It's perfect on toast, and I am already dreaming of a plum-Victoria sponge cake. And to be fair, it's rather good just eaten with a spoon straight from the jar. I do think leaving the skins on the plums was a good ideas they added a bit of bitterness to the jam. It's not too sweet with the little added tanginess, and the flavour of the plums comes through perfectly. For a first attempt at jam making, I would say this exceeded all my expectations, and furthermore it was much less effort than I had imagined. Particularly as the Culinary Consultant cleaned up the mess we had made in the kitchen!


Saturday 23 August 2014

Cinnamon swirl banana bread


Ok, so I'm not liking this whole posting only once a week thing. It always seems like an eternity since I last blogged on here. And I seem to have found my cooking mojo again. So I may go back to occasionally sneak in a mid-week post as well, depending on how things go. And I have at least two new recipes I want to try this weekend, which if they turn out to be successful, I may want to share.

Other than cooking mojo this has been a crazy week. I have been blown away by the generosity of people. In my current job, one of the things I do is co-ordinate biomedical research studies, and one aspect of that is to invite volunteers to come to the Blood Donor Centre to give a blood sample for our studies (oh and there is another study where we actually take a skin sample, but that is another story). Anyhow, I just fired up a new study, and was all of a sudden told that I need to get in 30 people before the end of September. I said there is no way in you know where that is ever going to happen. But then I got this huge tidal wave of responses from the invited volunteers, and all but two of them so far have been "yes, I would be happy to participate". So it might be we will be able to pull off a miracle and actually get 30 of them in during September. I am blown away how far people are willing to travel to come to us to participate, and how they are happy to even take a whole day off work just to come and give a blood sample. Working with these amazing people keep restoring my failing faith in humanity.

What never fails is my fascination for cake. I know it's a bit unimaginative to publish two cake recipes in a row (I hope you didn't miss my courgette and lemon bread last week). Oh wait, it's not cake, it's bread. That's ok then isn't it? Two bread recipes in a row. This little baby is where bananas go right before they would go into the bin. When they look ugly and black, but have all that lovely sweetness that will make this loaf taste heavenly. 

I have used the recipe almost unchanged from the Lovin' From the Oven blog. The only change I made was to use 2 bananas instead of 3 in the original recipe. But my bananas were huge so I think they more or less were equivalent to three punier bananas. Make sure they are over ripe, that's where all the sweetness comes from. Plenty of those pesky black dots on the peel, that's how you know they are good to go. And I love that all the ingredients are basic stuff, most likely to be in your kitchen any time those bananas threaten to turn too black, to satisfy a sweet craving at any time over-ripe bananas are available. And all you need is one bowl, do a bit of a mix and it's all ready to go in the oven.

Banana bread (makes one loaf):

2 over-ripe bananas, mushed with a fork
75 g melted butter
3/4 cups sugar
1 egg
1 tsp vanilla (I used vanilla paste)
1 tsp baking soda
pinch of salt
1 1/2 cups flour

For the swirl:

1/3 cup sugar (I used muscovado)
2 tbsp cinnamon

The howto:

Preheat oven to 175 degrees C (350 F). Butter a loaf tin (I used my silicon loaf tin as it saves the trouble of preparing it). Mix the smashed bananas with the melted butter, sugar, egg and vanilla. If you want to be fancy, you can mix the soda, salt and flour in another bowl, but to save me from doing dishes, I just tossed them right in and gave a gentile stir, making sure not to over mix. Combine the ingredients for the swirl separately. Add half of the batter into the loaf tin, sprinkle over half of the cinnamon sugar and add the rest of the batter. Sprinkle the rest of the sugar on top. Bake for 50-60 minutes until a cake tester comes out clean (mine took 60 minutes to bake).


The Verdict:
I've tried a few different recipes for banana loaf. And while none of them are bad, I never felt like I really understood why others were so into banana bread. After baking this, I can honesty say I finally understand what the hype is all about. It's deliciously moist, and the cinnamon swirl and cinnamon topping go perfectly with the banana. Some banana breads I have made are too "banana-y", this is just perfectly balanced. Sweet and a touch of banana, but not overwhelming. The comment from the Culinary Consultant "You can make this banana bread any time you like". While scoffing down his slice. I could imagine adding a handful of dark chocolate chips would be perfect in the batter, but it's also heavenly as is. Oh and as usual I apologise for the suboptimal photos, but I just took a quick snap as I was very busy getting to the actual eating part. You will understand what I mean when you make it, the scent of the bread is just unbelievable!

Saturday 16 August 2014

Courgette and lemon bread


So what have you all been up to? I know I wrote a few weeks ago about feeling like I had lost my kitchen mojo. I think just writing about it helped, as after that post, I spent almost the whole next weekend in the kitchen, making many things including this amazing bread.

I tried a recipe for courgette chocolate bread once. I didn't think I would ever say this about anything with chocolate, but it wasn't too brilliant. And it put me off courgette bread for a long time. Until I saw this Lemon Zucchini bread from My Baking Addiction when browsing the blogs I follow the other day. 

I feel it was divine intervention as we have quite a crop of courgettes that need to be harvested, and I am having courgettes and tomatoes coming out of my ears (not that I'm complaining, I love them!!). I have tried a few courgette cakes in the past, and found them at best more or less average, but I thought I would try this as we both like lemon drizzle cake in this house, and I thought the lemon drizzle would add a bit of oomph to what I usually find are rather boring cakes. This is a really simple bake to put together, all you need is one bowl, a spatula and a loaf tin. I love how it's called bread instead of cake, so you don't feel like you are having a treat, just a slice of bread. And not just any bread, courgette bread which has to count towards one of your five a day.

Courgette and lemon bread (makes one loaf)
3/4 cup sugar
2 tbsp lemon zest (I used whatever zest I could get from 2 lemons)
1 large egg
1/2 cup vegetable oil (I used rapeseed)
1 tsp vanilla extract
1 1/2 cups grated courgette (packed and undrained)
1 1/2 cups all purpose flour
1/2 tsp salt
1/2 tsp baking soda
1/4 tsp baking powder
1 tsp ground cinnamon

Glaze:
1/2 cup icing sugar
1 tbsp fresh lemon juice (I had to add a bit more to make the drizzle a good consistency)
1/4 tsp vanilla extract


The howto:
Preheat oven to 160 degrees C. Butter a 8x4 in loaf pan, or line with parchment paper (or use a silicone mould like I did, they don't need any prepping). Combine sugar and lemon zest, rubbing them together with your fingers until fragrant (it makes your fingers smell amazing too!). Add egg, oil and vanilla and mix. Add courgette. In a separate bowl, mix flour, salt, baking soda, baking powder and cinnamon (I probably don't have to say I can't be bothered with this step and just mix them straight into the batter, I am too lazy to wash up an extra bowl). Add the flour mixture to the courgette batter and mix only until combined. Pour into loaf tin and bake for 50-60 minutes or until a cake tester comes out clean. Cool in the tin for about 10 minutes before turning out onto a wire rack to cool completely. For the glaze, mix all ingredients and drizzle over the bread once it's completely cooled. Store in fridge, keeps for 4-5 days.

The verdict:
I was not expecting much from this bread due to my previous experiences. But it was very tasty. It was lovely and moist, and the glaze added the perfect final touch. I ate this for breakfast at work with a cup of coffee, and we also had it for pudding. I was amazed at how moist the bread was, even after several days in the fridge. Certainly a very enjoyable way to enjoy your courgettes. And finally a recipe for courgette bread I will make again!

Saturday 9 August 2014

Breakfast torta


We really like chunky big breakfast omelettes in this house. I often make a "English Breakfast" omelette which contains more or less the contents of an English Breakfast, i.e. chopped up bacon, sausages, tomatoes and mushrooms. I like to call it "Heart Attack Breakfast". But it takes quite a while to cook a big, chunky omelette in a skillet and it often tends to get very dark at the bottom before the top is done. Sometimes I make my omelettes in the oven, which helps them cook much more evenly, such as this tomato omelette. When I saw the recipe for this summer vegetable torta over at All Day I Dream About Food, I immediately knew it would be a great addition to our breakfasts as it's a bit more healthy and perfect for courgette season. I am constantly on the lookout for new courgette recipes, although I do have a few I am going to try so expect more courgette recipes in the near future.

I have made some modifications to the original recipe to accommodate what I had at hand. I left out the cream as I thought it was a bit superfluous. I also added in some bacon as I happened to have a few slices laying around waiting to be used up before going bad. I love that you can hide pretty much any leftovers in omelettes, perfect for a bit of a fridge clean to make sure you use up all those bits and bobs from the jars in the back. 

Almost vegetarian breakfast torta (serves about 8):
1 tbsp olive oil
1 onion, finely chopped
3-4 slices of bacon, cut into strips
5 mushrooms, sliced
1/2 large courgette or a whole medium courgette
1 sweet pepper
2-3 sundried tomatoes
1 tsp balsamic vinegar
1 tsp Worcestershire sauce
5 eggs
250 g cream cheese (I used Tesco Pesto flavoured lighter cream cheese)
2-3 tbsp finely cubed/grated leftover cheese bits (I used stilton and brie)
big handful chopped up herbs (I used flatleaf parsley)
pepper to taste

The howto:
Prepare the veg, finely chopiing onion, slicing mushrooms, bacon, sweet pepper and courgette. Preheat oven to 200 degrees C (390 F). Heat up oil in a skillet, add onion and cook for a few minutes until onions turn translucent. Add bacon and cook for a few minutes, add mushrooms and cook a further few minutes, increasing the heat for a while if needed to make the mushroom juices evaporate. Add courgette and sweet pepper, balsamic and Worcestershire sauce. Let cook for about 10 minutes, or until veg are starting to soften but not mushy (they will keep on cooking in the oven). Take veggies off the heat. In a bowl, mix the eggs, cream cheese, cheese cubes/grated cheese, herbs and pepper. Mix with the veggies and pour into a oven proof dish and cook for about an hour (depending on the size of your dish and therefore the thickness of the torta you may need more or less). The torta is done when it's golden brown and no longer jiggles in the middle. I put mine in a round 25 cm silicone mould, and it was done to perfection after exactly one hour.


The verdict:
This is a somewhat healthier option compared to my usual sausage and bacon filled brunches but it was very tasty. I think using a flavoured cream cheese is a great idea as it brings a nice pop of flavour, you could use your favourite cheese. I like that it's a great way to work in extra veggies in your diet. It was tasty and the Culinary Consultant liked it as well. Although I'm sure it would work great without the bacon, we both thought it did add that nice little extra to contrast with all the veggies. It also worked great as a lunch at work the next few days. It contains a good amount of protein and is low carb, although with all the cheese it does add up to a bit of fat per serving. My calorie calculator gave the following nutritional info for one serving (1/8 of the torta): 211 kcal per serving, 15,9 g fat, 5.2 g carbs, 9.4 g protein.


Saturday 2 August 2014

Courgette and sundried tomato tartlets


So I know it's been a long time since I have posted anything. The food blog has certainly had to step aside while I have been focusing on crafting. I am trying to find my inspiration in the kitchen at the moment, most of the time struggling and failing miserably. Today we had pizza for dinner, and I'm ashamed to admit it wasn't even home made pizza, it was store bought. With some fro-yo for dessert. I'm a very embarrassed food blogger at the moment. Writing this post did inspire me to dig out some new recipes to try this weekend, so I may not be a completely lost case afer all.

For me, my blogs have also always been a fun hobby, which is why I haven't forced myself to publish recently as I haven't felt the inspiration. I keep reading blog posts about how to be a good blogger and grow your blog and they all say one thing - be consistent about your posting schedule. So, to provide some sort of consistency and to make it easier for my readers to know what to expect, I have decided to gear down the food blog a notch and aim to publish once a week here on the food blog, and two or three times a week on the craft blog. Expect a new food post on Saturdays (or Sundays if Saturday manages to fly by...). I am working on adding an email subscription for the blog to make it even easier to keep track of my rather sporadic posting schedule. I will also start using my Instagram feed more. And there is always the InvisiblePinkFacebook, I always link new blog posts over there. And I Pin all my recipes on Pinterest as well (along with lots of other great recipes I come across). So I hope you will keep in touch through one of those channels and keep coming back to read my random thoughts on life and cooking.

And then onto the main star of today. I have become so lazy lately and I usually always use store bought pastry if I'm making pies. The day I made these little tartlets, the great thing was that I wasn't planning on making anything. However, we had a courgette in the garden which looked like it might be ready for the picking and we wanted to rescue before our insatiable slugs would have it for a light night snack. I decided I wanted to make little courgette and sun-dried tomato tartlets so I had to make my own pastry. I know it's not that hard, I have made it many times before. And once again I was reminded that there is no point in buying the store bough stuff as the home-made is infinitely better. There is just no comparison! I used this recipe from The Purple Spoon and it turned out to be a winner! I don't see any reason to repeat the recipe here, so click over to the Purple Spoon for instructions for the flakiest and most tasty pie crust ever!!

Courgette and sundried tomato tartlets (makes 4):
Pie crust (for 4 pies, make half the recipe or freeze the other half to use later)
1 small courgette
4 sundried tomato halves in oil
black pepper
dried thyme
2-3 tbsp finely grated cheddar
1-2 tbsp finely grated parmesan
1 tbsp oil from the sundried tomatoes

The howto:
Prepare the pie crust as described in the post (or use a store bought one). Make sure to prepare the crust in time as you need to let it chill for at least 1/2 hour before rolling.


Bake crusts blind for about 15 minutes, and then take out of the oven. Add courgette slices and sundried tomato, and sprinkle with black pepper and thyme. Drizzle a few drops of the tomato oil onto the pies. Sprinkle cheddar and parmesan on top and bake for another 10 minutes. All done!

The verdict:
I have no idea why this pie crust turned out completely different from most of my pie crusts. It must be the repeated rolling and folding, because I have never in my life produced such a flaky and perfect pie crust. Part of the reason for success may also be that I finally took the time to properly chill the crust before rolling it. One thing I need to do is get some beans to weigh down the crust while baking it, as it did shrink off the edges of the pie tins during the first bake. I know, I'm a bad, bad pastry chef... I promise I will get a big bag of beans when I go grocery shopping today!!

The tartlets turned out very tasty and I will certainly make them again as we are getting quite a load of courgettes from the garden currently.